
See exactly who is calling
Up to 16 characters of calling information — like “Ward 5 Bed 1” — appears on the duty station panel, so staff know precisely where help is needed.
Supplying wireless calling systems in South Africa since 2012
Nurse call duty station · up to 3000 buttons
Know exactly who is calling — and keep a record of every call. The B-901 shows up to 16 characters of calling information at the duty station, while the Voerka W900 software records each call and cancel for reporting.
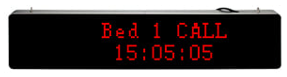
In a large facility, a call for help is only useful if staff know exactly where it came from — a corridor number or a generic bell sends them searching room by room.
And without records, there is no way to prove how quickly calls were answered — no call times, no cancel times, nothing to review or report on when questions are asked.
The B-901 displays up to 16 characters of calling information — such as “Ward 5 Bed 1” — so staff go straight to the right room. Together with the Smart Gateway and the Voerka W900 Desktop Software, every call and cancel is recorded with its time, ready to view and export to Excel for record keeping and reporting.
The calling information your team sees the moment a button is pressed — clear, specific and unmissable at the duty station.
Up to 16 characters of calling information — like “Ward 5 Bed 1” — appears on the duty station panel, so staff know precisely where help is needed.
The Voerka W900 software records the call and cancel times of every button, with reports you can export to Excel for record keeping and reporting.
Up to 3000 nurse call buttons per panel, with capacity software activated as your facility grows — no need to replace the system.
Calling information remains on display until the cancel button is pressed or the call is automatically cancelled — nothing is lost or forgotten.
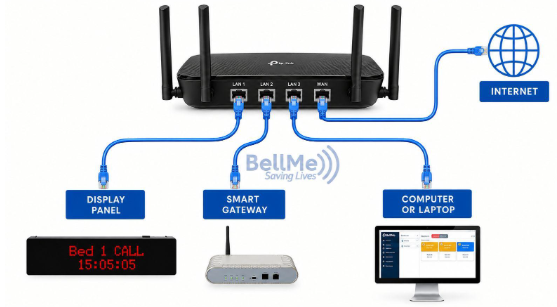
Plug in the display panel and smart gateway, and connect them — with the PC running the software — to your router via LAN cable.
Open the Voerka W900 software, scan for the display panel and gateway, and authorize both devices.
Add your buttons, build your layout of areas, and bind each button to its location — calls then display with the calling information you set.
A typical B-901 installation: the display panel, smart gateway and the PC running the Voerka W900 software, all connected to one router via LAN cable — with the internet keeping everything online.
Capacity, software reporting, display behaviour and cancellation options for the B-901 system.
Up to 3000 nurse call buttons can be programmed to this display panel. Depending on the number of nurse call buttons required, the respective capacity software will be activated.
Works in conjunction with the W-900 Desktop Software, allowing you to view and extract reports that indicate the call and cancel times of the nurse call buttons.
Display information allows for up to 16 characters. The characters may be aliphatic, numerical, or a combination of the two — for example, “Ward 5 Bed 1”.
When a nurse call button is pressed, the calling information remains on the duty station display panel until the cancel button is pressed, or until the call is automatically cancelled depending on your settings.
If you do not wish to use cancel buttons, the duty station display panel can be set to cancel calls automatically after your chosen period of time.
The B-901 system requires software, network access and wired LAN connections during operation and programming.
Follow the setup flow from connecting the hardware to adding buttons and mapping areas in Voerka W900.
Activate the software using the activation code received.
On the software, go to Device Center.
Go to Device Manage.
Go to Device Discover.
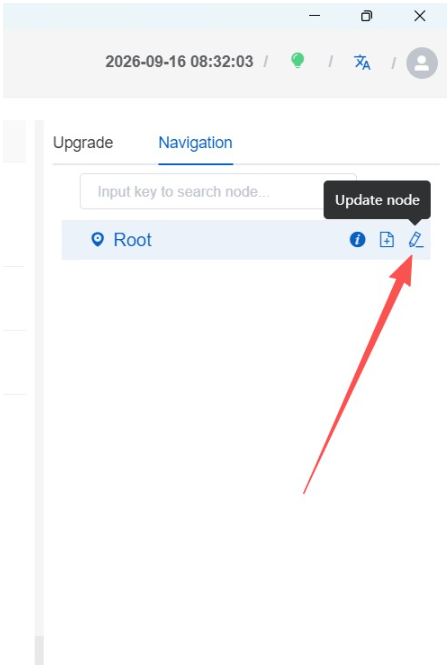
In Device Manage, open the Navigation tab, then click the edit icon on the Root node to open Update node.
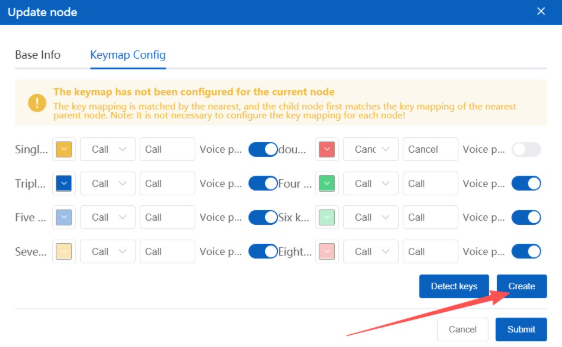
In Update node, open the Keymap Config tab. If the keymap has not been configured for the node, click Create.
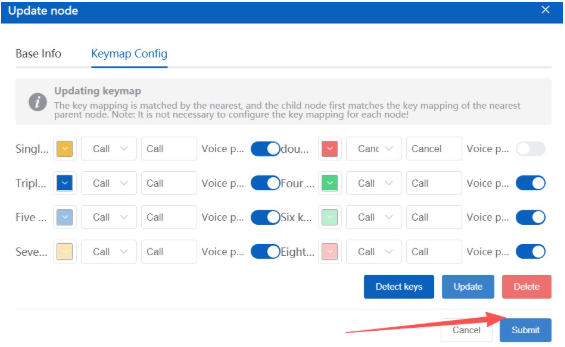
Set or update the key mapping, click Update, then click Submit to save the keymap for the node.
Direct guides for setup, linking devices, building layouts, programming buttons and changing settings. Click any video to watch it right here.


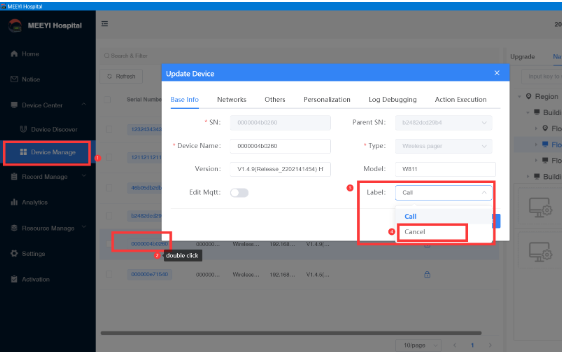
How to change the label for a cancel button
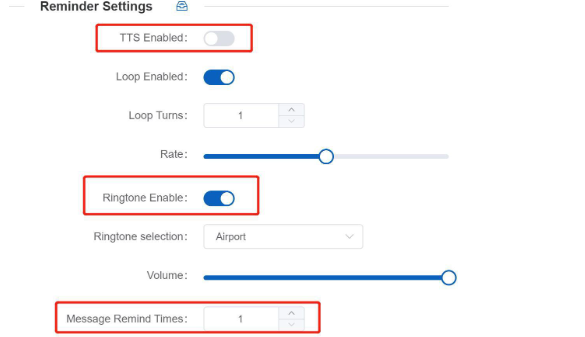
How to set interval ringing
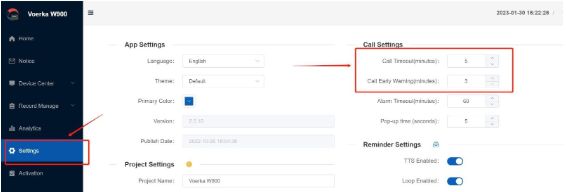
How to set auto cancel
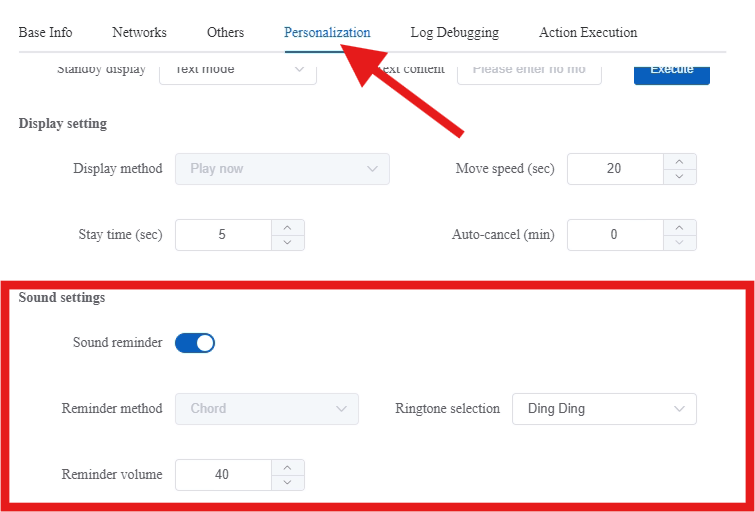
How to ensure the B-901 display panel sounds an alert when a button is pressed
No, you cannot. One ringtone is selected for all buttons from all areas.
Yes, you can use the Voerka Software and the Smart Gateway without the display panel. You cannot use the B-901 display panel without the smart gateway and Voerka Software.
Yes, you can add signal repeaters to extend the range of the system.
The system requires internet to be programmed and cannot work without being connected via a network.
Check the IP addresses. The gateway and display panel should not have the same IP address. If they are the same, change one of them. You can also try a different version of the software if it does not come right.
No, you can now have multiple call buttons with different calling information and cancel them with one cancel.
No, if you want the software to be used on multiple computers, you need to purchase the software for each PC.
Press and hold the reset factory settings button for 8 seconds. The network interface light where the LAN cable is plugged in will go off and on again once the reset has been successful.
Press and hold the reset factory settings button for 8 seconds. The network interface light where the LAN cable is plugged in will go off and on again once the reset has been successful.
In the software, under Settings, go to Database Backup and Open Folder. Copy the prod file. This is the backup.
In the software, under Settings, go to Database Backup and Open Folder. Replace the prod file.
Make sure that you are not using more than 16 characters. If it is still not showing correctly, unbind the button and delete the node, then add the node again and bind the button again.
Tell us where the product will be used and what you need the system to do. A BellMe representative will help with the right configuration.